earthOCEAN.tv

Behind the Camera with Chris Johnson of earthOCEAN.tv


BEHIND THE CAMERA

Tuesday, October 02, 2007

How to Photograph Dolphins in the Wild.

Atlantic Spotted Dolphin - Chris Johnson
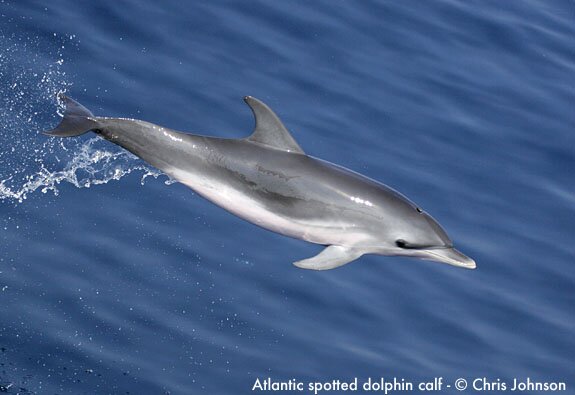
Dolphins are one of my favorite subjects to photograph. Their sheer pace, energy and vivacious attitude displayed while bowriding is a challenge to capture with a camera. At the interface where atmosphere meets ocean, they emerge to breathe with sheer athleticism. This can erupt into a spectacular display of color, light and motion in a brief instant.

I am very fortunate that my job allows me to spend time filming and photographing the lives of whales and dolphins. Today, I thought I would share some tips about photographing dolphins in the wild. This can be useful to people going whale or dolphin watching. It may also help researchers take better images through their photo-identification work.

Most of the time, one will encounter dolphins when a pod decides to ride the pressure wave of a generated by a boat. This is known as 'bowriding'. For someone who has never witnessed this, it is truly contagious. Depending on the species, the time of day and their mood, it is one of the most exciting things to witness in the natural world. I have photographed a wide range of species, from just a few animals, to enormous pods containing over 3500 animals. I am going to focus on how to take photographs while these animals bowride, how to capture some creative moments and also provide some simple tips to help obtain better images.

What kind equipment is needed?

I have taken tens of thousands of images of dolphins on both film and digital. When I purchased my first digital SLR (Canon 10D) and took it into the field, it was incredibly liberating. For the first time, I could get instant feedback on the images I was taking and I could make crucial adjustments in the field. It changed the way I took pictures, and made me a much better wildlife photographer. While you can get amazing results on film, I would highly recommend using a digital camera.

Also, I have used Canon equipment for many years only because it is a personal preference. Nikon make fantastic cameras but I do not have much experience with them in the field. Nikon makes equivalent lenses and camera bodies.

Camera Body:

The best piece of equipment is your camera body, and the type of lenses you have with you to photograph a subject. With some experimentation and lots of practice, you can achieve amazing results.

Dolphins travel at excessive speeds in the sea. To photograph them well, it is best to use a SLR type camera. When you take a shot, there should not be any delay when you press the shutter release, and when the shutter actually releases (also known as shutter lag). This means when you take a photo, there is a pause, and then a ‘click’ as the image is recorded. This is an issue with smaller ‘point and shoot’ type cameras, and can be the cause of great frustration when photographing fast moving subjects. If you have spent a lot of money and time travelling to a remote location, or are on a vacation where you get the opportunity to witness some spectacular behavior on a whale watch, the last thing you want to worry about is 'if' you got a great shot.

Digital SLRs have gotten much better over recent years. If you read the technical specifications listed online or on your camera manual, have a look at the 'shutter lag'. I own a Canon EOS 20D, and the shutter lag is listed as 'less than 0.01 second'.
The latest updated version of this camera body is the Canon EOS 40D is 0.059 seconds. For photographing fast moving subjects like dolphins, this is very important.

  • Canon EOS 40D - 0.059 seconds
  • Canon EOS Rebel XTI (Also known as the 400D) - 0.01 Seconds
  • Canon EOS 5D - 0.075 seconds
  • Nikon N80 - 0.08 seconds
  • Nikon 2DXs - 0.037 seconds
  • Nikon D200 - 0.05 seconds

(Note- I researched SONY & FUJI DSLRs, but the shutter lagtime is not listed by the manufacturer - source: www.BHPhoto.com)

Lenses:

Even though I have my favourites, it really doesn't matter what brand of camera equipment you use. Photographing wildlife from a boat, you really need a zoom lense. This gives you the flexibility to frame your shots very quickly, and is vital to getting the type of image you want on a boat at sea.

My favorite Canon lense to photograph dolphins is the Canon 100-400mm IS L lense. Due to the functionality of the zoom (it pulls in and out, rather than twists), people are mixed about this lense - they either love it or hate it. For photographing wildlife, I feel it is the most versatile around. I have used it for 7 years.

I love this lense because it allows me to get some very unique close-up shots of dolphins. The image stabilization truly helps on a rolling boat.

However, you can use a wide variety of lenses to capture images of dolphins. The Canon 70-200mm IS L lense is fast, sharp, and produces amazing results. For other types of shots, take out a wide-angle zoom to capture the entire pod of animals around a boat like the Canon 24-105mm f4. If pro lenses are not in the budget, then the Canon 70-300mm f4.5-5.6 is the best lense you can own. It is lightweight, really versatile, has image stabilization, and is very good value for the money.

On a boat, I use one digital body with the 100-400mm lense, and have a few batteries and memory cards with me. Sometimes I will use my 17-35mm 2.8 lense to photograph a group of dolphins. I sometimes photograph with two bodies, but I find that with the movement of the swell, that it can be difficult enough standing up with one camera! If the boat pitches the wrong way when you are least expecting it, then another camera body hanging at your side will most likely cushion a devastating blow.

If you can afford it, get large memory cards so you can store more images on it without having to switch out the card in a salt air environment. Believe me, taking pictures at sea, I seem to have the most slippery hands around and have dropped cards (and rolls of film) accidentally into the deep blue. I use lexar cards and they have never let me down. If you are purchasing new memory cards, make sure the write speed of the card is fast.

Other invaluable equipment to have is proper cleaning gear. Being exposed to a salty environment can be devastating to a camera. I usually clean my camera body and lenses at the end of the day. But, I am constantly on the lookout for salt spray on the lense. It is so important to keep your lense clean before you take a picture. It seems so simple, but on everything from a large whale watch boat to a small zodiac, a camera lense will always attract salt spray. So check it constantly.

So, have lense tissue and lense cleaner in your pocket at all times. At the end of the day I use rubbing alcohol to clean the body and lense. When I am travelling, I take a number of alcohol swabs in individual packets with me. These pack up well with my gear. I have a couple in my pocket in case the camera gets wet and I can clean the salt-water spray off it immediately.

So you have your equipment, and you are ready to photograph dolphins.

For people who have never seen dolphins in the wild, I would recommend reading about the animals before you go out. Learn about the species of marine mammals that you may encounter, and learn about some of the behaviours that you may witness in the wild.

  • Marine Mammals of the World: A Comprehensive Guide to Their Identification (Hardcover)
    by Thomas A. Jefferson, Marc A. Webber, & Robert Pitman.
    (note - this is being released in November, and I have a few photos in the guide, including the cover shot, so I am a bit biased!)

    http://www.amazon.com/Marine-Mammals-World-Comprehensive-Identification/dp/0123838533/ref=sr_1_2/103-3039505-5112603?ie=UTF8&qid=1191201019&sr=1-2

  • Whales, Dolphins & Porpoises (Nature Company Guides)
    by Erich Hoyt & Mark Cawardine

    Erich Hoyt & Mark Carardine are some of the world’s leading authorities on the natural history of cetaceans, and whale watching. I highly recommend any titles by either author.

    http://www.amazon.com/Whales-Dolphins-Porpoises-Nature-Company/dp/078355284X/ref=sr_1_18/103-3039505-5112603?ie=UTF8&qid=1191201177&sr=1-18

  • Guide to Marine Mammals of the World
    by Brent S. Stewart, Phillip J. Clapham, James A. Powell, Randall R. Reeves

    http://www.amazon.com/National-Audubon-Society-Marine-Mammals/dp/0375411410/ref=pd_bbs_sr_1/103-3039505-5112603?ie=UTF8&qid=1191200863&sr=8-1


For people who have never seen these animals bowride, it is important to put the camera down, and just watch the animals first. Give yourself time to enjoy the moment but also observe how the animals are moving.

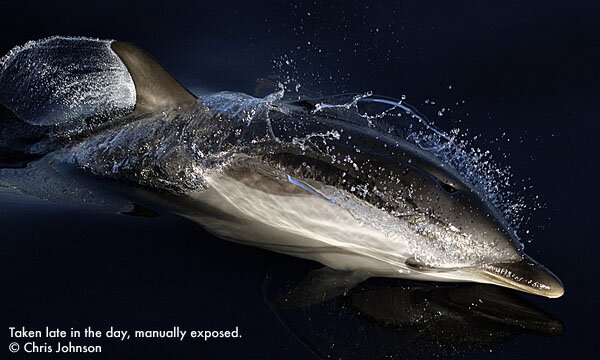
While you are doing that, take a look to see where the sun is. If you have a watch on, take a look at the time. In taking photographs of wildlife outdoors, the light is best the first hour of the morning, and the last couple of hours of the day. The end of the day is my favorite time to take photographs of dolphins because of the creative effects you can achieve.

However, you may not be with animals at these times of the day. If you are on a whale watch, you may be out for a couple of hours in the middle of the day. What is important is to use the sun as your main light. If you are on the bow of a boat, and you have bow riding animals on either side, keep the light at your back, and focus on the animals in the good light. This is a simple rule, but is very important to remember when caught up in the excitement of the moment.

Striped Dolphin - Chris Johnson

What this does it force you to focus on animals in areas where you have a better chance to get good photos. If there is a pod of dolphins, I always concentrate my efforts on the side where there is the best light. For me, this in not a rule, but I try to stick to it as much as possible. What is hard is when animals are jumping out of the water or doing acrobatic behaviors in the area where you are looking right at the sun.

If you are photographing for research, this is a different story and the priority is taking any photo of an animals that can be used to identify its dorsal fin, capturing any unique markings, or taking pictures of the flukes for some whale species)

What type of image do you want to take?

I believe there is no right or wrong way to photograph wildlife. However, there are correct ways of obtaining various types of shots. Everyone sees a potential image differently when it happens, and the art of photography is revealed in how you can capture that moment.

For photographing dolphins and whales, it is important to set up your camera for the type of shot you want.

  • Look at your watch, and check the time.
  • Look at where the sun is.
  • Set the ISO.
  • Double check the camera setting (Manual, Shutter Priority (TV), Aperture Priority (AV).
  • Turn on the preview with your histogram displayed (if you can – this is possible in a Canon and can be done on a Nikon).

I will focus on two types of shots that you may be interesting in taking – the "freeze frame", where you freeze all of the action in the image, and "painting with motion", where you capture the motion in the image to tell a story.
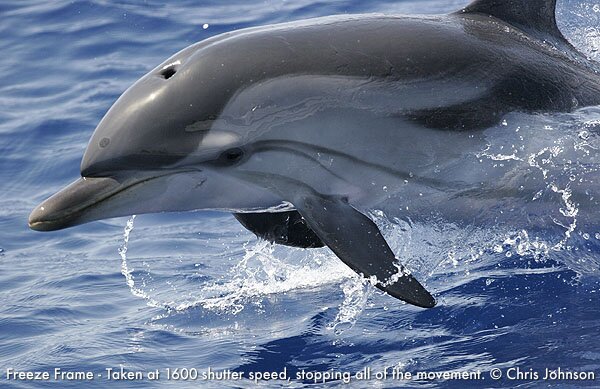
Freeze frame:
I love to 'freeze' these acrobatic athletes in motion and blur out the background as much as I can. I love to document that slice of time where the motion is too fast to see the beauty of the moment, and freeze everything around it. I want to give this moment some depth and layer the subject in the picture. In order to do this, I use a high shutter speed with a shallow depth of field. It is risky because sometimes you can be totally out of focus. But, when you hit it just right, a dolphin will ‘pop’ out of the frame with a blurred background.

  • ISO - I set the ISO to 200 but this is a personal preference. I love this setting because it allows me to obtain higher shutter speeds with less grain. On the Canon EOS 20D, I do not like the digital grain exhibited at 400 ISO and above. Some scientists that take pictures of animals for photo-identification research need to have their image razor sharp. They will set the camera at 800 ISO. In the daylight, I feel this is too much, and you can get away with 400 ISO is you want to be safe.

  • Camera Setting - I always shoot in manual mode. I have my watch on my wrist, constantly checking what time of day it is, and where the sun is in relation to the animals. I find it difficult to be on automatic because depending on the time of day, the dark blue sea will trick the light meter. Because the light meters in cameras are known as 'reflective meters', they can be fooled depending on the surface (color) they are pointed at. This can cause you to overexpose your image in automatic mode.

    I get around this by pointing my camera at the sky to a color as close to grey as possible. Reflective light meters in cameras are set to record light off of what is known as 18% Grey or middle grey. So, it you take a picture of a white wall and shoot in automatic mode, it will look grey. If you take a picture of a black wall, it will look grey.

    BUT, you don’t have to shoot this way. If you want to shoot in an automatic mode, I would shoot in shutter priority. To freeze the action, choose a shutter speed of over 1250; even 1600 or higher. So if you are on a whale watch, set you ISO at 400 to be safe, and then you set your camera to shutter priority (Tv), at 1600.

    Next, underexpose your image a little by setting your light meter to compensate for the overexposure setting your light meter will trick your camera. Set your camera to 2/3 of one stop, under exposed. This way, when you point your camera at dark blue water, you have just tricked your camera into taking an image that will be better exposed.

    You can do this is Av mode (Aperture priority) too. If you want to try blurring out the background, set it on the lowest ‘f stop’ (e.g. 2.8 or 4.5). Since this setting will let in a lot of light, it will inherently give you a high shutter speed. With a high shutter speed, you will be able to freeze the action.

    Striped Dolphin - Chris Johnson


    Painting with motion:
    Wildlife photographer Franz Lanting is the master of this in documenting the natural world – painting with light and painting with motion. It takes commitment to attempt to use motion to tell a story in a photograph.

    I would NOT recommend this for researchers attempting to photograph animals for photo-id programs. This is an artistic way of looking at an animal interacting with its environment. Because all of the elements are moving – the sea, the animals, and the boat – it can be extremely difficult to use the camera to capture motion without it being an absolute mess.

    To capture this type of image, you want to shoot with a slow shutter speed. This is what I do.

  • Set the ISO to 100 (or 50 if you can).
  • Reduce the shutter speed. The setting depends on the lense that I am using. With a zoom lense (like the 100-400mm), try reducing the shutter to 250 or even 125. With a wide angle lense (like the 17-35mm), I bring it down to 30. Even though I will try to shoot manually, try shooting in Shutter priority (Tv) and remember to change the setting on the light meter reducing exposure to 2/3 of one stop.
  • While watching one dolphin moving, try to move with it as you are taking a photo. If you are on land, and you pan with an image, this is also called ‘panning’ – moving with your subject to blur out the background. This can give you some very artistic imagery, but it can be a mess as well. If you are shooting digital, it doesn’t really matter, because you can delete the images!

    I highly recommend trying new ways of taking images using a digital camera because this experimentation can make you a much better photographer, and sometimes see, and document, a subject in a fresh way.

    However, if you try to paint with motion, make sure you practice on a subject on land first before you try it at sea, because you will probably be cursing my name for many hours!
    Striped Dolphin - Chris Johnson

    Checking Exposure:

  • HISTOGRAM – On a canon, you can have a preview image display after you take a photograph. A fantastic tool to use is the histogram to view the level of exposure of the image. Just looking at the LCD screen especially on a bright day is the wrong way to check exposure. On a canon, you can set you camera to display it over the preview image.
    I have found this to be invaluable!

    To someone who has never seen a histogram, they are very simple to read. The left side of the meter is underexposed, the right side - overexposed, the center – properly exposed. If you take an image, you will see areas that are over, under and overall, properly exposed. Have a look at the following image.


    Before you go out into the field, take some photographs and learn how your histogram works. It is the most important tool you have to see whether you have proper exposure. When I am in the field, I will take test shots all of the time, to check everything is ok with my settings, exposure, lense, and even with the battery. With digital you can delete everything, so it is a great way to make sure that you are totally prepared to capture images of dolphins moving a extreme speeds.

    Common Problems and Questions:

  • "There are dolphins around, but when I take a picture, I just photograph their tails!"
    Well, sometimes the movement is so fast that you have to predict the shot as it is happening. For example, depending on the weather conditions, I will watch dolphins moving underwater. I often pick an animal I want to photograph, and wait until it comes to the surface to breathe. That way, I can time exactly when I take a shot. Also, even though it is helpful having a fast frame rate to get a number of shots of one sequence, I try to focus on taking one image. This way, I really focus on the animal, what it is doing, and time releasing the shutter just right.

  • "It is late in the day, and when a dolphin breaches out of the sea, it is totally overexposed…What do I do?"
    If you are shooting on automatic like Shutter Priority(Tv), try setting the camera to underexpose the image a bit.

  • "Do I shoot JPEG or RAW? format?"
    A JPEG is a compressed image, while RAW is a digital negative.

    Well, I always shoot raw, because it is a digital negative, thus providing future flexibility. The color can be manipulated in a software program like Photoshop. It can also be scaled up in resolution for printing better than a JPEG. In addition, photo festivals or competitions usually want to see you RAW image to check exposure and make sure that it was not digitally altered. Even though you can fit more JPEG images on a memory card, I love shooting RAW because you are future-proofing your images in so many ways, and you can export a 16 bit TIFF file from it, which allows you to color correct it in greater detail.

    JPEG is great because you can fit more images on a memory card, you can preview your images right away, and sometimes expose you image better then RAW right out of the camera. Most researchers I know shoot in JPEG for this reason. It really comes down to personal preference. However, if you want to color correct the image, it is only 8 bit.

  • "Does it matter how many megapixels my camera has?"
    Well, one of the most frustrating parts of digital photography is that camera get better each year in resolution. If you are a professional who does print work, then yes, keeping up with technology to get the most amount of resolution in a picture is very important. If you are limited by a budget, get a camera body that has at least 8 megapixel resolution. This is good enough to print an A4 (8.5”by11” image) and if you are shooting raw, can be printed even larger.

    Most digital cameras, including the affordable Canon Rebel XTI are now 10 megapixels in resolution. If you are purchasing a new camera, I would highly recommend obtaining the highest resolution you can, with the least amount of shutter lag. For photographing wildlife, I would recommend getting a body that can shoot at least 5 frames per second. This should last you for years to come.

    Summary:
    The following is a list of recommendations if you want to take better photographs of dolphins:

    • If you have never seen dolphins, read more about the species you are hoping to photograph before heading out on a whale watch or into the field.
    • If you can, use a Digital SLR with a zoom lense.
    • Have a big memory card to store lots of images with an extra battery, or two.
    • Set the ISO to 200 or 400. Probably 400 to be safe.
    • Decide if you want to shoot JPEG or RAW.
    • If this is your first time seeing dolphins in the wild, take a moment to watch the animals.
    • Make sure to be aware of where the sun is, and if possible, use it to your advantage.
    • Decide what type of image you want before you take a photo.

      • Freeze frame – use a high shutter speed (over 1/1250 second)
      • Paint with motion – use a slow shutter speed (1/60 second)

    • Make sure to check the images using your histogram while you are on a whale watch or in the field so you can make proper adjustments as you go. Take a couple of test shots of the sky or people around you to make sure everything is right BEFORE you see any animals.
    • From time to time, check that your lense is clean.

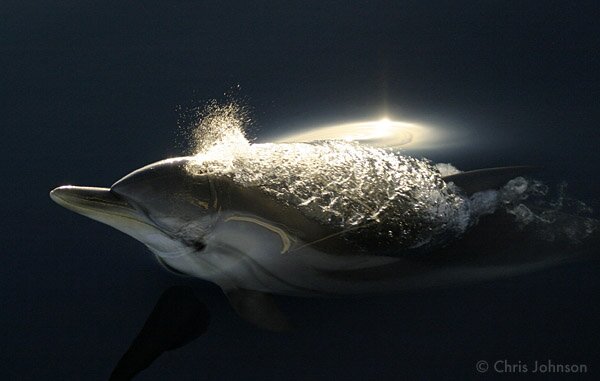
    Don’t forget to enjoy being on the ocean, and if you are lucky, documenting some incredible wildlife encounters. The following image is one of my favorites, which break the rules a bit, shooting into the sun. Enjoy!

    Striped Dolphin - Chris Johnson

    Labels: , , , ,

Thursday, April 05, 2007

Production Notes - Southern Right Whales of Argentina

The Making of Southern Right Whales of Argentina - Part 3

From the start we wanted to film this project in high definition (HD). Researching what type of HD, was the most time consuming part of planning. For months, I have been following a lot of websites to keep up with latest trends - like HDforIndies and StudioDaily. In 2006, I attended NAB in Las Vegas to get a better feel for the affordable technology out there and to get my hands on the latest technology that might be available…
Chris Johnson cleans film and photography equipment
The past couple of years have seen the development of some new exciting technologies in HD and the reduction in price of cameras whereby high-quality could be obtained with minimal cost. But there is a big difference between what is defined as HD as HDV. The choice between the two would prove to be very costly in the end in many ways (but that is for the next post!).

We knew we were going to edit and deliver the program in 16x9 PAL DV and deliver it on DVD. However, we wanted to film in the highest resolution possible to archive the footage for future use. So the most inexpensive way forward was to film in HDV on a 'prosumer' camera, and edit the project in DV - downconverting the footage from within the camera.

Another limitation we had was our equipment for post-production. All of our editing would be done on my MAC G4 powerbook with an external 500gig Lacie drive. The post-production would take place in a variety of environments - in hotel rooms, in airport lounges, even in my brother's apartment in Brooklyn, NY.

Mobility was our constant theme in this project. We have had a lot of experience with producing short documentaries with limited equipment and resources using minimal field equipment.

So our post-production path was going to be a very simple one. We would log and capture clips in Final Cut Pro (FCP), organize the types of shots we were obtaining (while trying to capture behaviors of whales on our master list - much easier said than done!). We would then create an edit in PAL DV. We were writing the script, adapting parts of it to the images we were capturing, so it was a very loose process at times. It was important to us to capture the spontaneity of the life of researchers studying whales. Genevieve and I researching whales for 6 years previous, we knew that the best stuff captured on video would be the small surprises, where you just had to let the camera roll and let the chaotic scenes unfold before your eyes.

So, parts of the post-production process took place during the production. While in Argentina, I was trying to create simple scenes to help build a story around the script Genevieve was writing. Then, I would create a more detailed 'offline edit' in FCP. This was important because I could then create an 'online' and color correct at a later time (if that time ever comes!). Because of the budget and timeframe, we felt that this was the best way forward.

TOOLS

The terrain and the weather of Patagonia, were going to dictate what type of equipment that we brought with us to film southern right whales. In the end, I brought two cameras, a Canon XL H1 and the Sony Z1 with an Amphibico underwater housing.

Why two cameras on a limited budget? Well, we owned a Z1 already and we ended up purchasing the Canon XL H1. I am a big believer in owning your own gear (if you can afford it). We had a little money saved up, and I just loved filming on my old Canon XL-1. It was a great camera to film on the ocean, because of the image stabilizer built into the lense. For filming on the ocean, it is fantastic.

However, the XL H1 is a much different camera. Because you are filming in a higher resolution, I found the eyepiece very difficult to find focus. Even with the enhanced 'peaking' feature, which creates a grainy like image to help aid focusing, I would spend as much time as possible tweaking this. I ended up filming using the autofocus feature at times, when the action was important to capture. For example, when in a zodiac filming a mating group of southern right whales, I would sometimes set to autofocus, and worry more about balance, exposure and framing. When I was able to take my time to film, I would spend extra time with the focus. Unfortunately, because of the budget, I was not able to bring a portable monitor with me, which I learned over the weeks, even shooting HDV, is so vital.

Over the period of 6.5 weeks, there were four areas that we were permitted to film southern right whales. All of them had their own challenges as discussed in my previous post - filming from the cliffs, filming from the beach, filming from a zodiac and filming underwater.


  • Filming from the cliffs - The cliffs of Peninsula Valdes can be up to 60 meters high, and give you a great perspective of the animals below. Spectacular cliffs and a smaller remote field observation post called 'the cliff hut' surround the research camp that is used by ICB every year. This is where researchers can observe and take data on whales for hours at a time.
    Chris Johnson filming Southern Right Whales from the cliffs of Peninsula Valdes, Argentina
    So filming here would require the use of some telephoto lenses. Since all of my photography gear is Canon, I could use my Canon lenses (in theory) with the XL adaptor for the Canon XL-H1 camera, and get very close to the animals. I could use the long end of my Canon 100-400mm zoom lense and with the 7x extension, theoretically turn it into a 2700mm lense!

    Did it really work? Well, yes and no. Because Patagonia is known for its wild weather, it can be an extremely windy place. When the wind is blowing (often times at 20-25 knots), it would shake my zoom lense tremendously even on a steady tripod.

    However, this worked when the weather was calm. When there was the slightest amount of wind, there would be too much slight vibration, which would render the attached XL lense totally useless. However, I was rewarded by just on a number of occasions where I captured some nice footage of one of the major conservation issues southern right whales face in this area - attacks by kelp gulls.

    Kelp gulls attack southern right whales, and feed on the skin. This only happens in Argentina, and you can see circular wound with blubber exposed. Have a look at the film - it is terrible to watch it happen. The reaction of the whales can be very disturbing - especially in an area which is so important for resting. Some of the wounds that develop in the calves can be quite extensive.

    Another behavior I wanted to document with using a long lense was 'breaching' - when a whale launches itself clear out of the water. Usually southern right whales may breach when the weather is rough, or after kelp gulls attack them. Often, when it was calm, it was a period of rest for southern right whales. Of course when it is calm, it is the best time to film. So there was a lot of waiting, and patience involved in filming southern right whales.

  • Filming from the beach - At high tide, southern right whales get very very close to the shoreline with their calves, allowing you to put a tripod close to the ground and film. It is a very unusual to get this close to any species of cetacean. In the right light and weather conditions, it is possible to capture very stable imagery.

    Mother calf pairs often times will rollover each other, creating a wonderful display only 10-20 meters away! I was able to get some great shots from the beach. I do admit, these were my favorite times to film right whales. I would look around the camera, and take some time to enjoy being in the unique area surrounded by whales.

  • Filming from the Zodiac - ICB have a 14-foot inflatable zodiac that they use for the research. Unfortunately, it had some engine problems this year, which limited its use a bit. Also, it can only hold 4 people - usually 3 people if I was filming or someone was biopsying southern right whales.
    Chris Johnson films a southern right whale from a zodiac
    So it was challenging at times, when the weather was calm, to gain access to it. Often, I would tag along and try to document some behaviors of southern right whales from the boat and be in the background of the researchers doing their work. It was difficult this year, because the weather was terrible on a regular basis. So we could not get on the water as much as we could have liked.

    It is a fine line you trend when documenting scientific research, they have to get their data, and you have to get your shots, which help tell the story and raise awareness about the whales, conservation issues and the researchers. Along the way, there is always going to be compromise. But it is important, not to be in the way, be positive and enjoy it. I always find by trying to work this way, it is a much more enriching experience for everyone, and at the end of the day, everyone eventually gets what they need!

  • Filming underwater. This was the most challenging of environments to film southern right whales. First of all, I had to obtain a special permit to be in the water filming whales from the Argentine government. This took some time to do, and ICB did a great job of obtaining it for the project.

    Because of logistics with the research program, we started filming underwater during the final two weeks of filming. Honestly, I was a bit nervous about it, because over the 6.5 weeks we were in Peninsula Valdes, it would seem to work out that we would film 1 day in every 5.

    The weather really limited the use of the zodiac so much, at one point we were discussing hiring another larger boat to film. Also, the weather in Valdes changes rapidly, one moment it could be calm for a couple of hours, then you find yourself with the wind increasing to 20 knots, and would have to go back in to the research station.

    In Peninsula Valdes this time of year, the sea is very cold and the visibility is incredibly poor. The whales can be very, very curious, so they will approach you, but they can be difficult to see. Because of the visibility, I often was 'shooting from the hip', where I would not look through the viewfinder of the camera and the underwater housing. I would set the camera up for 'auto-everything' (exposure and focus) and just try to document anything in front of me, while attempting to maintain my balance (and cool) among aquatic mammals that can reach a size of 45 feet and weight over 20 tons…

    Most of the time while filming whales, I like to have an external viewfinder above the housing so I can watch what is happening around me, while getting a good view of what I am filming underwater. However, in the case, the camera could 'see' better than I could underwater.

    We planned to film 5 full days, and ended up doing three days of 2 to 3 hours sessions. In all cases, the weather and wind picked up where we would have to stop.

    So as with any experience, it is important to listen to the people who are the experts in an area, no matter how much you want to, again, patience is so important with 'getting a shot'. This is where Dr. Mariano Sironi was fantastic. He was the official observer and he is very experienced with divers in the water around whales.

    Luckily, my first encounter with southern right whales was with a juvenile female, who seemed more curious about this large human floating around in a big black wetsuit and odd-looking yellow mask and snorkel!

    She moved by me very slowly, but because the visibility was only 3 meters at most (on a good day). When the whale was in sight, she would emerge from the cloudy water very, very quickly.

    This whale first approached me, close to my camera, and we were almost nose-to-nose. For about 45 seconds she floated like this, a meeting of two species - one its natural environment, the other an honored visitor, a new terrestrial friend.

    She would circle around and come back and just pause in front of me. I did not have to move much in the water. I just waited for her to approach me, and I never swam after her.

    After each pass, she approached me closer and closer.
    Often, I would see her enormous eye gazing back at me, watching me float by with this giant silver box tipped with a giant round glass on its periphery. I wonder if she was looking at her reflection in my lense?

    Filming right whales underwater was absolutely mesmerizing. A couple of times, I was so in awe, that the distant voice in my head would remind me to watch out for the rest of her body moving past. A few seconds after the head pass by, the flukes would emerge from the murky green abyss, and sweep past me like a giant fan. During one pass, she even raised her fluke over my head as she cruised by.

    At one point during filming, she turned belly up right in front of my camera with her pectoral fins gently sweeping past the lense. Nothing could describe this - it was on of the gentlest acts I have ever witnessed from a wild animal or a supposed tame species like a human.

    I was able to film a number of whales during those three days, but the first encounter was the most memorable and enjoyable. It was this day, the sea calmed for a brief window of time and I was just in the right place at the right time - a common theme for wildlife filmmakers in any environment.

    All the senses break down in encounters like these with wildlife. I feel truly honored to have spent 45 minutes face to face with a southern right whale in its environment, in its world, in its home.


FILMING EQUIPMENT-

  • 1 x Canon XL-H1 - Canon's latest HD version of the XL-1 - a great DV camera that many wildlife filmmakers used to produce material on a budget. We ended up purchasing an H1 in the end, because of a number of reasons. I wanted to film the documentary in HDV, I wanted to use the built-in image stabilization, which is very very important when filming on a zodiac. I always use a zoom lense when filming whales because often you have to frame what you are filming very very quickly.

  • 1 x Sony HVR Z1 -This was a good choice of camera to put underwater. It was great in the murky seas on Peninsula Valdes and I will use it again.

  • 1 x Amphibico Phenom Pro Digital Marine Housing for the Z1 with a wide angle lense. I orginally bought and old piece of stock, which had vignetting in the lense. I sent it back to Amphibico and they promptly fixed it. It is my understanding that this is not a problem now with this housing, but make sure to ask any UW housing dealer if there is vignetting in their lenses.

  • 1 x Lowel Caselite - A great light and fantastic for interviews.
    I really like fluorescent lights for interviews, But, the best thing about it is that it works on both 110v (US) and 220v (South America / European /Australian ) power sources! So, for traveling, it is a great light to have. However, when I was picking up my luggage in NY, the handle popped off somewhere between the plane and the baggage pickup!

  • 1 x Litepanels Mini with a built in battery.
    I use this as an 'on' camera light and love it. They have recently come out with a 1-foot by 1-foot light I would like to experiment with but is a bit expensive. This also runs on both 110/220-volt power.

  • 2 x Sennheiser K6 microphones (ME66), boom pole, windscreens. I have used these mics for years and love them.

  • 1 x Wireless Mics (Azden) - I have had a lot of problems with these mics and the particular brand I own. They are low cost wireless lapel mics, and I will not use them again.

  • 1 x Manfrotto tripod (with a 501 Video head) - I use it both for video and have another head for photography. It is a little light for the XL H1 but works fine on a budget.

  • 1 x Lacie 500gig hard drive (firewire 800) Big Disk Extreme with triple interface. I have had this drive for a couple of years, and it works well in the field. Pretty tough,and it has never failed me yet! I used to own a 250 gig lacie 'porche' drive, and had problem with it overheating. However, the big disk, has been wonderful in may different environments!

    Photo equipment -
    I did not bring alot of photo equipment with me on this trip; just a digital body with a couple lenses and some Fuji Provia slide film.

  • 1 x Canon 20D with 4 batteries. I had a 17-35mm 2.8 lense and a 100-400mm IS 4.5/5.6 lense. I love the 100-400 L IS lense, and it is my primary lense when photographing wildlife from a boat or zodiac. The 20D is a fantastic camera and has survived some big waves too.
  • 1 x Canon 580Ex flash and softbox
  • 3 x 1 gig cards
  • 1 x Canon EOS 1V - It is pretty battered from too much time on the ocean. But when I want to shoot really wide ( because I cannot afford a 5D or EOS 1D mark II right now) or shoot film this is just a fantastic camera body!
  • 1 x Nikonos Underwater Camera & 20mm lense - our tough 'old skool' camera with a Nikon strobe. It is probably going to be the last trip before we officially retire it to the bookcase. I love it, but it is time to invest in a digital underwater kit.

    FINAL THOUGHTS?

    So, did I have any regrets in the production of Southern Right Whales of Argentina?

    Well, there were two - filming in HDV and some audio issues.
    First the sound - I usually take a big 'blimp' with me, however it was boxed up in storage in Melbourne, Australia. I had no way of getting it sent over before the trip. With some last minute purchases I could not afford purchasing a new one and I ran out of time to search for a used one. Peninsula Valdes is a VERY windy place. Even with some protection of my canon microphone with Lightwave windsock (EQ102) you need a blimp to record sound with an external shotgun mic to really make it worthwhile especially if the wind is over 15-20 knots!

    Using HDV - Since coming returning from Argentina, I have looked at some of the footage on an HD monitor and the detail is incredible. However, the path to post-production to edit an HD version is a bit more time consuming and expensive.
    I have done some editing in final cut pro in native HDV. When you start to color correct it, well, it can just fall apart. In the future, I will most likely do an online edit of the clips and recapture clips uncompressed through a Miranda's HD-Bridge DEC - but first I'm going to have to upgrade my editing equipment.

    The XL H1 is a great all-round camera for the price because of the lense. For filming on the ocean, the image stabilizer is fantastic - just make sure to turn it off when it is mounted on a tripod. While I did learn how to use the canon viewfinder because of the 'peaking' feature, it took a lot of time to try to focus. Especially during the interviews, I wanted to blur the background with the shallow depth of field. Without taking the time, it could have been a disaster.

    Also, I learned that you must have a monitor with you in the field that can map every single pixel of an HD single. When you are looking at monitors, make sure to check the native resolution. Some models from Panasonic are below the native resolution of HD but have an 'HD zoom” feature which allow you to zoom into the signal and pan around the mapped pixels. A French cinematographer we met in Piramides, had one with him, and it looked fantastic!

    It is so important, and every article I have read stresses how important a monitor is when filming HD. This was so apparent when I filmed right whales underwater in very murky water. There were times that I could not position myself properly with the sun behind me in relation to filming a whale. When the sunlight hit the dome just right, it lit up every minute bubble. I could not see in the viewfinder - even after I wiped the dome with my hand. Luckily, this occurred only a few times, but on one important shot. It is still usable, but I still curse myself over it!

    Either way, every experience like this is a learning experience! Along the way, it was challenging, draining, enjoyable, and of course, a lot of fun.

    Labels: , , , , , , ,

Tuesday, January 16, 2007

A little bit of history....

How did we do it? The Making of Southern Right Whales of Argentina : Part 1

Having finished the documentary, I often wonder that myself!

The most important issue, with producing wildlife and science productions, before any money is raised, before any plane tickets are booked, before any equipment is rented or purchased, and sometimes before a script is even written, is to gain access to the subject. In our case, it was gaining access to film southern right whales. Without the access to whales, we could not even begin to think about producing a film like this.

Because so many people are involved in the research, the conservation, obtaining the permits to do the research, and the administration and organization of specific geographical areas, filming whales requires the ability to create numerous partnerships. We were initially invited by an NGO, Instituto de Conservacion de Ballenas (www.icb.org.ar), to film and produce a video for a new education initiative in Argentina. They received funding from the government of the province of Chubut – it was called “Bringing Whales to Your School” ("Trayendo las ballenas a tu escuela").

With the help of ICB, we obtained the necessary permits from the provincial government to film whales within the reserve, and underwater. ICB also acted our translators and 'fixers', arranging accommodation, a rental car, additional permits and generally helped out with other administrative tasks along the way. Since we are absolutely hopeless at speaking Spanish, this partnership was crucial in making the process work.

In exchange for all of their effort, we produced a 5-minute piece about their organization with the footage shot for the documentary program, which co-wrote. We also gave ICB footage and photographs for future press releases and educational initiatives. The lesson we learned through the years is that, it is always beneficial to form good partnerships with a local NGO.

From the beginning of the project, we all agreed that the documentary would be produced in both Spanish and English, as stipulated by the grant we received to make the film – and that it would be distributed for free to students in Argentina as part of the education program they were developing, while we would host the online versions.

When documenting local issues in another country, we feel it is crucial to share experiences, especially with students. So often people do not know about the issues surrounding whales that inhabit their coastal waters. Those who come in to film too often leave little for the local community in return. This was an occurrence we often witnessed in countries we worked in on a former project - the Voyage of the Odyssey.

The Voyage of the Odyssey was our epic project. For 5 and a half years, Genevieve and I were part of a team that traveled around the world on a whale research sailboat, documenting the work, the science, the research, local issues, the nature and wildlife, all while producing environmental stories for a web series hosted by PBS – www.pbs.org/odyssey

It was very unique, in that PBS funded a program that would only be on the internet. We produced stories on the boat, called Odyssey logs, that we published via satellite directly to the PBS website.

We had incredible power to publish 'live'- when we posted a story via our laptop connected to the marine satellite setup, it was up on the servers in Washington – from anywhere on the planet. It was a unique experience to create and upload stories while being at sea surrounded by hundreds of miles of ocean and no land in sight.

This was before the popularity of blogs took off, or even podcasting. We relied on creating audio reports in Real Audio format, but found that most people just read the transcripts of the stories - sometimes educational, sometimes anecdotal and people liked seeing the photos from the day. Periodically, we would upload short video documentaries anywhere from 3-5 minutes in length to bring people along on our journey.

While finding and producing these stories for the 5 and a half-year, we always had to do it on a tiny budget, with minimal equipment - most of which we had to purchase ourselves. We learned to be very creative using 'off the shelf' tools and equipment.

In 2001, one year into the expedition, we started earthOCEAN media as a way to manage our money and be creative with tools. We purchased cameras, film, developed the film, bought a video camera, laptops and even got the software to build everything with. The boat had a couple of computers, but they were used mostly for research. So while we had great access, and a pipeline directly to PBS, that was it - that was where we learned how to produce materials on a limited budget.

Part experiment, part groundbreaking, partly insane, the site is still online, even though our last report was published when the Voyage finished in August 2005. It has since turned into a unique education resource ( believe it or not, our most popular story is on the giant squid – more about that another day! )

When the Odyssey departed in March 2000 from San Diego, we had a DV camera (Canon XL-1), a G4 Mac desktop running final cut pro (version 1) with a 80 gig hard drive, notepad (to create HTML pages – I coded everything by hand, due to PBS online production policies), and Photoshop. We had a 1 megapixel Nikon coolpix that would only work for 10 minutes at a time (due to problems with the batteries). Often, I would take 'screen shots' from the video shot with the XL1 to help with imagery for the website. As time progressed, we purchased one of the first G4 notebooks to come out, a few external 60 gig hard drives (which would only last a few months in the hot, salty conditions of the boat), an external DVD burner and a copy of DVD studio pro version 1.

For the documentary, Southern Right Whales of Argentina, we applied a similar model. We would film with digital cameras, edit on a faster G4 notebook computer, an external hard drive (this time holding 500 gig), but bring lights, an underwater housing, and a few important audio tools for interviews.

Most important, we would bring two video cameras – one for only filming underwater (Sony HDV Z1), which we already owned, and another for filming interviews, and the majority of ‘topside’ footage (Canon XL H1). We purchased the Canon XL H1 before we left, after much research and much debate for a variety of reasons I will outline later.

Why two cameras with a limited budget? Well, I once flooded a Sony FX1 in a GATES housing while filming humpback whales in Western Australia. Luckily it happened on the second to last day filming, so all was not lost. From that point on, I did not want to spend so much money, time, and effort getting to a location without having a backup just in case the worst happened again. No matter how careful you can be, you are taking a huge risk by putting a camera in the water - especially if it the only one you have!

For us, we had to be creative with all of these factors in the production of this documentary. However, the biggest issue was budget. This type of project this was made on a very small budget - produced, written and filmed in Argentina and while traveling back to the USA, and doing all of the post-production in hotel rooms and sleeping on couches along the way.

Labels: , , , , ,

>> Home       >> Series       >> Behind the Camera       >> Gallery       >> Education       >> About Us