How to Photograph Dolphins in the Wild.
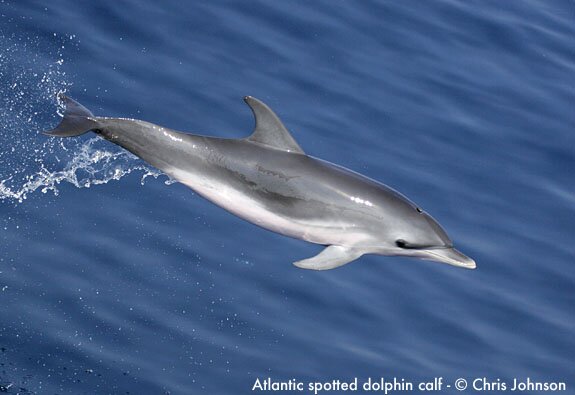
Dolphins are one of my favorite subjects to photograph. Their sheer pace, energy and vivacious attitude displayed while bowriding is a challenge to capture with a camera. At the interface where atmosphere meets ocean, they emerge to breathe with sheer athleticism. This can erupt into a spectacular display of color, light and motion in a brief instant.
I am very fortunate that my job allows me to spend time filming and photographing the lives of whales and dolphins. Today, I thought I would share some tips about photographing dolphins in the wild. This can be useful to people going whale or dolphin watching. It may also help researchers take better images through their photo-identification work.
Most of the time, one will encounter dolphins when a pod decides to ride the pressure wave of a generated by a boat. This is known as 'bowriding'. For someone who has never witnessed this, it is truly contagious. Depending on the species, the time of day and their mood, it is one of the most exciting things to witness in the natural world. I have photographed a wide range of species, from just a few animals, to enormous pods containing over 3500 animals. I am going to focus on how to take photographs while these animals bowride, how to capture some creative moments and also provide some simple tips to help obtain better images.
What kind equipment is needed?
I have taken tens of thousands of images of dolphins on both film and digital. When I purchased my first digital SLR (Canon 10D) and took it into the field, it was incredibly liberating. For the first time, I could get instant feedback on the images I was taking and I could make crucial adjustments in the field. It changed the way I took pictures, and made me a much better wildlife photographer. While you can get amazing results on film, I would highly recommend using a digital camera.
Also, I have used Canon equipment for many years only because it is a personal preference. Nikon make fantastic cameras but I do not have much experience with them in the field. Nikon makes equivalent lenses and camera bodies.
Camera Body:
The best piece of equipment is your camera body, and the type of lenses you have with you to photograph a subject. With some experimentation and lots of practice, you can achieve amazing results.
Dolphins travel at excessive speeds in the sea. To photograph them well, it is best to use a SLR type camera. When you take a shot, there should not be any delay when you press the shutter release, and when the shutter actually releases (also known as shutter lag). This means when you take a photo, there is a pause, and then a ‘click’ as the image is recorded. This is an issue with smaller ‘point and shoot’ type cameras, and can be the cause of great frustration when photographing fast moving subjects. If you have spent a lot of money and time travelling to a remote location, or are on a vacation where you get the opportunity to witness some spectacular behavior on a whale watch, the last thing you want to worry about is 'if' you got a great shot.
Digital SLRs have gotten much better over recent years. If you read the technical specifications listed online or on your camera manual, have a look at the 'shutter lag'. I own a Canon EOS 20D, and the shutter lag is listed as 'less than 0.01 second'.
The latest updated version of this camera body is the Canon EOS 40D is 0.059 seconds. For photographing fast moving subjects like dolphins, this is very important.
- Canon EOS 40D - 0.059 seconds
- Canon EOS Rebel XTI (Also known as the 400D) - 0.01 Seconds
- Canon EOS 5D - 0.075 seconds
- Nikon N80 - 0.08 seconds
- Nikon 2DXs - 0.037 seconds
- Nikon D200 - 0.05 seconds
(Note- I researched SONY & FUJI DSLRs, but the shutter lagtime is not listed by the manufacturer - source: www.BHPhoto.com)
Lenses:
Even though I have my favourites, it really doesn't matter what brand of camera equipment you use. Photographing wildlife from a boat, you really need a zoom lense. This gives you the flexibility to frame your shots very quickly, and is vital to getting the type of image you want on a boat at sea.
My favorite Canon lense to photograph dolphins is the Canon 100-400mm IS L lense. Due to the functionality of the zoom (it pulls in and out, rather than twists), people are mixed about this lense - they either love it or hate it. For photographing wildlife, I feel it is the most versatile around. I have used it for 7 years.
I love this lense because it allows me to get some very unique close-up shots of dolphins. The image stabilization truly helps on a rolling boat.
However, you can use a wide variety of lenses to capture images of dolphins. The Canon 70-200mm IS L lense is fast, sharp, and produces amazing results. For other types of shots, take out a wide-angle zoom to capture the entire pod of animals around a boat like the Canon 24-105mm f4. If pro lenses are not in the budget, then the Canon 70-300mm f4.5-5.6 is the best lense you can own. It is lightweight, really versatile, has image stabilization, and is very good value for the money.
On a boat, I use one digital body with the 100-400mm lense, and have a few batteries and memory cards with me. Sometimes I will use my 17-35mm 2.8 lense to photograph a group of dolphins. I sometimes photograph with two bodies, but I find that with the movement of the swell, that it can be difficult enough standing up with one camera! If the boat pitches the wrong way when you are least expecting it, then another camera body hanging at your side will most likely cushion a devastating blow.
If you can afford it, get large memory cards so you can store more images on it without having to switch out the card in a salt air environment. Believe me, taking pictures at sea, I seem to have the most slippery hands around and have dropped cards (and rolls of film) accidentally into the deep blue. I use lexar cards and they have never let me down. If you are purchasing new memory cards, make sure the write speed of the card is fast.
Other invaluable equipment to have is proper cleaning gear. Being exposed to a salty environment can be devastating to a camera. I usually clean my camera body and lenses at the end of the day. But, I am constantly on the lookout for salt spray on the lense. It is so important to keep your lense clean before you take a picture. It seems so simple, but on everything from a large whale watch boat to a small zodiac, a camera lense will always attract salt spray. So check it constantly.
So, have lense tissue and lense cleaner in your pocket at all times. At the end of the day I use rubbing alcohol to clean the body and lense. When I am travelling, I take a number of alcohol swabs in individual packets with me. These pack up well with my gear. I have a couple in my pocket in case the camera gets wet and I can clean the salt-water spray off it immediately.
So you have your equipment, and you are ready to photograph dolphins.
For people who have never seen dolphins in the wild, I would recommend reading about the animals before you go out. Learn about the species of marine mammals that you may encounter, and learn about some of the behaviours that you may witness in the wild.
- Marine Mammals of the World: A Comprehensive Guide to Their Identification (Hardcover)
by Thomas A. Jefferson, Marc A. Webber, & Robert Pitman.
(note - this is being released in November, and I have a few photos in the guide, including the cover shot, so I am a bit biased!)
http://www.amazon.com/Marine-Mammals-World-Comprehensive-Identification/dp/0123838533/ref=sr_1_2/103-3039505-5112603?ie=UTF8&qid=1191201019&sr=1-2
- Whales, Dolphins & Porpoises (Nature Company Guides)
by Erich Hoyt & Mark Cawardine
Erich Hoyt & Mark Carardine are some of the world’s leading authorities on the natural history of cetaceans, and whale watching. I highly recommend any titles by either author.
http://www.amazon.com/Whales-Dolphins-Porpoises-Nature-Company/dp/078355284X/ref=sr_1_18/103-3039505-5112603?ie=UTF8&qid=1191201177&sr=1-18
- Guide to Marine Mammals of the World
by Brent S. Stewart, Phillip J. Clapham, James A. Powell, Randall R. Reeves
http://www.amazon.com/National-Audubon-Society-Marine-Mammals/dp/0375411410/ref=pd_bbs_sr_1/103-3039505-5112603?ie=UTF8&qid=1191200863&sr=8-1
For people who have never seen these animals bowride, it is important to put the camera down, and just watch the animals first. Give yourself time to enjoy the moment but also observe how the animals are moving.
While you are doing that, take a look to see where the sun is. If you have a watch on, take a look at the time. In taking photographs of wildlife outdoors, the light is best the first hour of the morning, and the last couple of hours of the day. The end of the day is my favorite time to take photographs of dolphins because of the creative effects you can achieve.
However, you may not be with animals at these times of the day. If you are on a whale watch, you may be out for a couple of hours in the middle of the day. What is important is to use the sun as your main light. If you are on the bow of a boat, and you have bow riding animals on either side, keep the light at your back, and focus on the animals in the good light. This is a simple rule, but is very important to remember when caught up in the excitement of the moment.
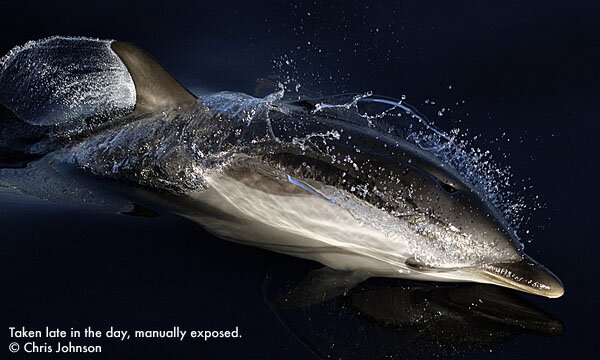
What this does it force you to focus on animals in areas where you have a better chance to get good photos. If there is a pod of dolphins, I always concentrate my efforts on the side where there is the best light. For me, this in not a rule, but I try to stick to it as much as possible. What is hard is when animals are jumping out of the water or doing acrobatic behaviors in the area where you are looking right at the sun.
If you are photographing for research, this is a different story and the priority is taking any photo of an animals that can be used to identify its dorsal fin, capturing any unique markings, or taking pictures of the flukes for some whale species)
What type of image do you want to take?
I believe there is no right or wrong way to photograph wildlife. However, there are correct ways of obtaining various types of shots. Everyone sees a potential image differently when it happens, and the art of photography is revealed in how you can capture that moment.
For photographing dolphins and whales, it is important to set up your camera for the type of shot you want.
- Look at your watch, and check the time.
- Look at where the sun is.
- Set the ISO.
- Double check the camera setting (Manual, Shutter Priority (TV), Aperture Priority (AV).
- Turn on the preview with your histogram displayed (if you can – this is possible in a Canon and can be done on a Nikon).
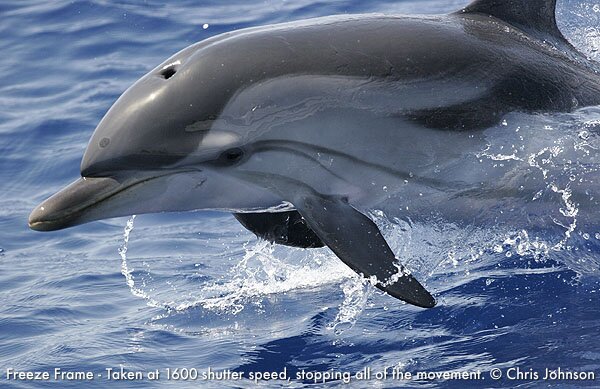
I will focus on two types of shots that you may be interesting in taking – the "freeze frame", where you freeze all of the action in the image, and "painting with motion", where you capture the motion in the image to tell a story.
Freeze frame:
I love to 'freeze' these acrobatic athletes in motion and blur out the background as much as I can. I love to document that slice of time where the motion is too fast to see the beauty of the moment, and freeze everything around it. I want to give this moment some depth and layer the subject in the picture. In order to do this, I use a high shutter speed with a shallow depth of field. It is risky because sometimes you can be totally out of focus. But, when you hit it just right, a dolphin will ‘pop’ out of the frame with a blurred background.
- ISO - I set the ISO to 200 but this is a personal preference. I love this setting because it allows me to obtain higher shutter speeds with less grain. On the Canon EOS 20D, I do not like the digital grain exhibited at 400 ISO and above. Some scientists that take pictures of animals for photo-identification research need to have their image razor sharp. They will set the camera at 800 ISO. In the daylight, I feel this is too much, and you can get away with 400 ISO is you want to be safe.
- Camera Setting - I always shoot in manual mode. I have my watch on my wrist, constantly checking what time of day it is, and where the sun is in relation to the animals. I find it difficult to be on automatic because depending on the time of day, the dark blue sea will trick the light meter. Because the light meters in cameras are known as 'reflective meters', they can be fooled depending on the surface (color) they are pointed at. This can cause you to overexpose your image in automatic mode.
I get around this by pointing my camera at the sky to a color as close to grey as possible. Reflective light meters in cameras are set to record light off of what is known as 18% Grey or middle grey. So, it you take a picture of a white wall and shoot in automatic mode, it will look grey. If you take a picture of a black wall, it will look grey.
BUT, you don’t have to shoot this way. If you want to shoot in an automatic mode, I would shoot in shutter priority. To freeze the action, choose a shutter speed of over 1250; even 1600 or higher. So if you are on a whale watch, set you ISO at 400 to be safe, and then you set your camera to shutter priority (Tv), at 1600.
Next, underexpose your image a little by setting your light meter to compensate for the overexposure setting your light meter will trick your camera. Set your camera to 2/3 of one stop, under exposed. This way, when you point your camera at dark blue water, you have just tricked your camera into taking an image that will be better exposed.
You can do this is Av mode (Aperture priority) too. If you want to try blurring out the background, set it on the lowest ‘f stop’ (e.g. 2.8 or 4.5). Since this setting will let in a lot of light, it will inherently give you a high shutter speed. With a high shutter speed, you will be able to freeze the action.
Painting with motion:
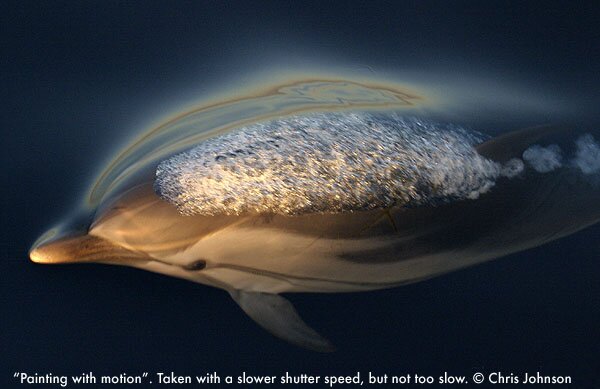
Wildlife photographer Franz Lanting is the master of this in documenting the natural world – painting with light and painting with motion. It takes commitment to attempt to use motion to tell a story in a photograph.
I would NOT recommend this for researchers attempting to photograph animals for photo-id programs. This is an artistic way of looking at an animal interacting with its environment. Because all of the elements are moving – the sea, the animals, and the boat – it can be extremely difficult to use the camera to capture motion without it being an absolute mess.
To capture this type of image, you want to shoot with a slow shutter speed. This is what I do.
- Set the ISO to 100 (or 50 if you can).
- Reduce the shutter speed. The setting depends on the lense that I am using. With a zoom lense (like the 100-400mm), try reducing the shutter to 250 or even 125. With a wide angle lense (like the 17-35mm), I bring it down to 30. Even though I will try to shoot manually, try shooting in Shutter priority (Tv) and remember to change the setting on the light meter reducing exposure to 2/3 of one stop.
- While watching one dolphin moving, try to move with it as you are taking a photo. If you are on land, and you pan with an image, this is also called ‘panning’ – moving with your subject to blur out the background. This can give you some very artistic imagery, but it can be a mess as well. If you are shooting digital, it doesn’t really matter, because you can delete the images!
I highly recommend trying new ways of taking images using a digital camera because this experimentation can make you a much better photographer, and sometimes see, and document, a subject in a fresh way.
However, if you try to paint with motion, make sure you practice on a subject on land first before you try it at sea, because you will probably be cursing my name for many hours!
Checking Exposure:
- HISTOGRAM – On a canon, you can have a preview image display after you take a photograph. A fantastic tool to use is the histogram to view the level of exposure of the image. Just looking at the LCD screen especially on a bright day is the wrong way to check exposure. On a canon, you can set you camera to display it over the preview image.
I have found this to be invaluable!
To someone who has never seen a histogram, they are very simple to read. The left side of the meter is underexposed, the right side - overexposed, the center – properly exposed. If you take an image, you will see areas that are over, under and overall, properly exposed. Have a look at the following image.
Before you go out into the field, take some photographs and learn how your histogram works. It is the most important tool you have to see whether you have proper exposure. When I am in the field, I will take test shots all of the time, to check everything is ok with my settings, exposure, lense, and even with the battery. With digital you can delete everything, so it is a great way to make sure that you are totally prepared to capture images of dolphins moving a extreme speeds.
Common Problems and Questions:
- "There are dolphins around, but when I take a picture, I just photograph their tails!"
Well, sometimes the movement is so fast that you have to predict the shot as it is happening. For example, depending on the weather conditions, I will watch dolphins moving underwater. I often pick an animal I want to photograph, and wait until it comes to the surface to breathe. That way, I can time exactly when I take a shot. Also, even though it is helpful having a fast frame rate to get a number of shots of one sequence, I try to focus on taking one image. This way, I really focus on the animal, what it is doing, and time releasing the shutter just right.
- "It is late in the day, and when a dolphin breaches out of the sea, it is totally overexposed…What do I do?"
If you are shooting on automatic like Shutter Priority(Tv), try setting the camera to underexpose the image a bit.
- "Do I shoot JPEG or RAW? format?"
A JPEG is a compressed image, while RAW is a digital negative.
Well, I always shoot raw, because it is a digital negative, thus providing future flexibility. The color can be manipulated in a software program like Photoshop. It can also be scaled up in resolution for printing better than a JPEG. In addition, photo festivals or competitions usually want to see you RAW image to check exposure and make sure that it was not digitally altered. Even though you can fit more JPEG images on a memory card, I love shooting RAW because you are future-proofing your images in so many ways, and you can export a 16 bit TIFF file from it, which allows you to color correct it in greater detail.
JPEG is great because you can fit more images on a memory card, you can preview your images right away, and sometimes expose you image better then RAW right out of the camera. Most researchers I know shoot in JPEG for this reason. It really comes down to personal preference. However, if you want to color correct the image, it is only 8 bit.
-
"Does it matter how many megapixels my camera has?"
Well, one of the most frustrating parts of digital photography is that camera get better each year in resolution. If you are a professional who does print work, then yes, keeping up with technology to get the most amount of resolution in a picture is very important. If you are limited by a budget, get a camera body that has at least 8 megapixel resolution. This is good enough to print an A4 (8.5”by11” image) and if you are shooting raw, can be printed even larger.
Most digital cameras, including the affordable Canon Rebel XTI are now 10 megapixels in resolution. If you are purchasing a new camera, I would highly recommend obtaining the highest resolution you can, with the least amount of shutter lag. For photographing wildlife, I would recommend getting a body that can shoot at least 5 frames per second. This should last you for years to come.
Summary:
The following is a list of recommendations if you want to take better photographs of dolphins:
- If you have never seen dolphins, read more about the species you are hoping to photograph before heading out on a whale watch or into the field.
- If you can, use a Digital SLR with a zoom lense.
- Have a big memory card to store lots of images with an extra battery, or two.
- Set the ISO to 200 or 400. Probably 400 to be safe.
- Decide if you want to shoot JPEG or RAW.
- If this is your first time seeing dolphins in the wild, take a moment to watch the animals.
- Make sure to be aware of where the sun is, and if possible, use it to your advantage.
- Decide what type of image you want before you take a photo.
- Freeze frame – use a high shutter speed (over 1/1250 second)
- Paint with motion – use a slow shutter speed (1/60 second)
- Make sure to check the images using your histogram while you are on a whale watch or in the field so you can make proper adjustments as you go. Take a couple of test shots of the sky or people around you to make sure everything is right BEFORE you see any animals.
- From time to time, check that your lense is clean.
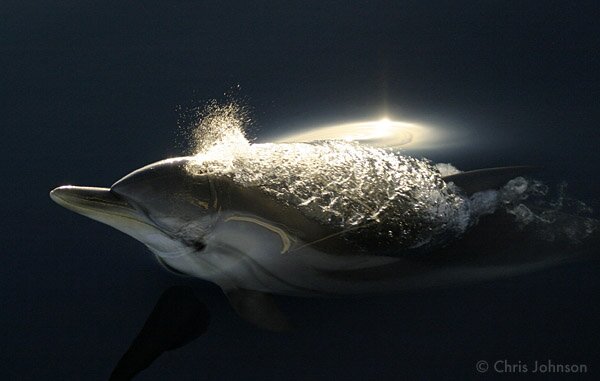
Don’t forget to enjoy being on the ocean, and if you are lucky, documenting some incredible wildlife encounters. The following image is one of my favorites, which break the rules a bit, shooting into the sun. Enjoy!
Labels: Canon 20D, Chris Johnson, DSLR, Photographing Dolphins, Wildlife Photography
